


Understanding the Limitations: How much cash can you take out of Ukraine?
How much cash can you take out of Ukraine? Are you planning a trip to Ukraine and wondering how much cash you can take out of the country? It’s …
Read Article
Keeping your Yamaha receiver up to date is essential for ensuring optimal performance and accessing the latest features. Firmware updates provide bug fixes, stability improvements, and often introduce new functionalities. In this step-by-step guide, we will walk you through the process of updating your Yamaha receiver firmware.
Step 1: Check for available updates
Before starting the update process, it is important to check if there are any available firmware updates for your Yamaha receiver. Visit the official Yamaha website or use the MusicCast Controller app to search for firmware updates specific to your receiver model. Make sure to note down any important information or instructions provided by Yamaha.
Step 2: Prepare a USB drive
Next, format a USB drive to FAT32 file system as it is the most compatible format for Yamaha receivers. Ensure that the USB drive has sufficient storage space to accommodate the firmware update file. It is recommended to use a USB drive with a capacity of at least 1GB to account for future updates.
Step 3: Download and transfer the firmware update file

Download the firmware update file from the Yamaha website or the MusicCast Controller app. Once downloaded, extract the firmware file (if necessary) and transfer it to the root directory of the USB drive. Ensure that the firmware file is not placed inside any folders on the USB drive, as this may prevent the receiver from recognizing the update.
Step 4: Update your Yamaha receiver firmware
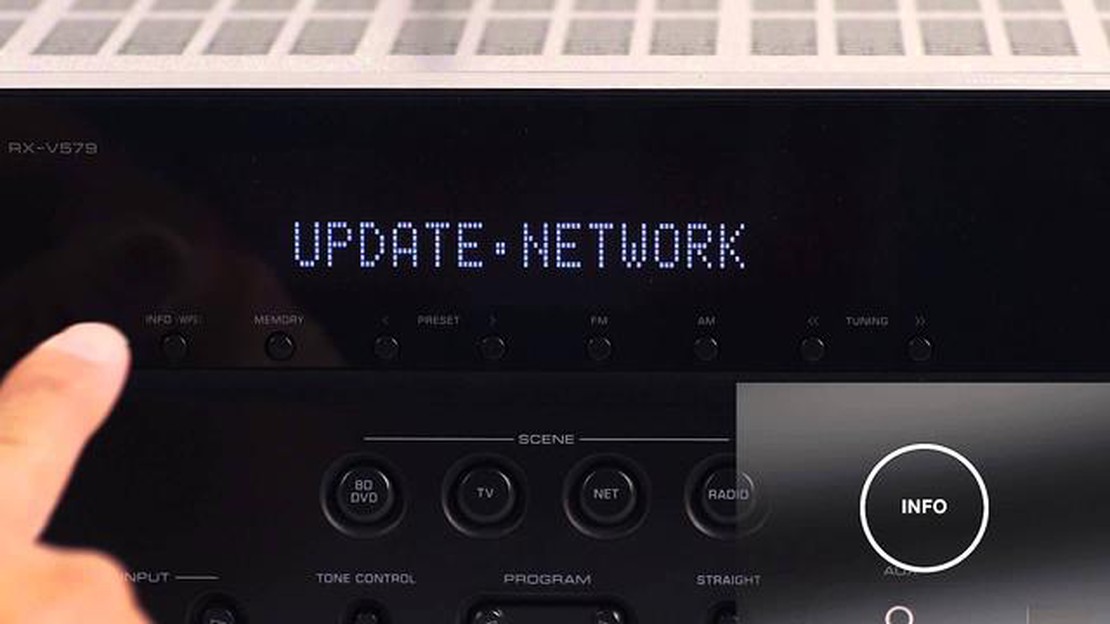
With the USB drive containing the firmware update file ready, disconnect any other USB devices from your Yamaha receiver. Insert the USB drive into the appropriate USB port on the receiver. Access the receiver’s menu and navigate to the firmware update section. Follow the on-screen instructions and select the firmware update file located on the USB drive. Confirm the update and allow the receiver to complete the update process. It is crucial not to interrupt the update to avoid damaging the receiver.
Step 5: Verify the firmware update
Once the update is complete, the receiver will reboot. After the reboot, check the firmware version on your Yamaha receiver to ensure that the update was successful. If the firmware version matches the one you downloaded, congratulations! Your Yamaha receiver is now up to date.
By following these step-by-step instructions, you can easily update the firmware on your Yamaha receiver. Regularly updating the firmware will help maximize your receiver’s performance, improve compatibility with other devices, and provide an enhanced audio experience.
Read Also: Step-by-Step Guide: How to do option trading in HDFC securities?
Your Yamaha receiver firmware is an important component of your audio system, and keeping it up to date is essential for optimal performance and functionality.
Updating your receiver firmware brings a range of benefits that can enhance your overall audio experience. Here are some reasons why you should regularly update your Yamaha receiver firmware:
Read Also: What Are BCA Securities Called? Explained
1. Improved Performance: Firmware updates often include bug fixes and enhancements that can improve the overall performance of your receiver. These updates can resolve issues related to audio dropout, communication errors, and other performance-related problems.
2. Enhanced Compatibility: Firmware updates often provide improved compatibility with the latest audio and video formats, ensuring that your receiver can handle the latest technologies and content. This ensures a seamless playback experience without any compatibility issues.
3. New Features: Yamaha often releases firmware updates that introduce new features and capabilities to their receivers. Updating your firmware allows you to take advantage of these new features, which can enhance your audio experience and provide additional functionality.
4. Security Fixes: Firmware updates also play a crucial role in ensuring the security of your Yamaha receiver. These updates often include security patches that address any vulnerabilities or potential threats, keeping your receiver protected against unauthorized access or malicious attacks.
5. Stability and Reliability: By keeping your firmware up to date, you can ensure that your Yamaha receiver operates with maximum stability and reliability. Firmware updates can address any stability issues, reducing the chances of system crashes or other performance problems.
6. Longer Lifespan: Regularly updating your Yamaha receiver firmware can help extend its lifespan. By keeping your receiver up to date, you can ensure that it remains compatible with future technologies and content, providing you with a reliable audio system for years to come.

Overall, updating your Yamaha receiver firmware is a simple yet essential step to ensure the best performance, compatibility, and security of your audio system. By regularly updating your firmware, you can enjoy an enhanced audio experience and peace of mind knowing that your receiver is up to date and functioning optimally.
Updating the firmware on your Yamaha receiver is important to ensure that you have the latest features, bug fixes, and performance improvements. Here is a step-by-step guide on how to check for firmware updates for your Yamaha receiver:
It is recommended to regularly check for firmware updates for your Yamaha receiver to ensure that you are always running the latest software. Firmware updates can enhance the performance and functionality of your receiver, so it is important to keep it up to date.
Updating the firmware on your Yamaha receiver is important because it helps improve the performance and functionality of the device. Firmware updates often include bug fixes, improvements to audio processing, compatibility with new technology, and other enhancements that can enhance your listening experience.
It is generally not recommended to revert to an older firmware version after updating your Yamaha receiver. However, if you encounter significant issues or compatibility problems after the update, you can contact Yamaha support for assistance. They may be able to provide you with guidance or a solution to the problem.

How much cash can you take out of Ukraine? Are you planning a trip to Ukraine and wondering how much cash you can take out of the country? It’s …
Read Article
Are losses on options tax deductible? Options trading can be a risky endeavor, and while it offers the potential for significant gains, it also …
Read Article
Trading market sentiment in forex: A comprehensive guide Understanding market sentiment is crucial for successful trading in the forex market. Market …
Read Article
The Turtle Trading Rules: What You Need to Know In the 1980s, Richard Dennis and William Eckhardt developed a trading experiment known as the Turtle …
Read Article
Understanding Stock Market Eye: The Ultimate Guide for Beginners If you are interested in investing or trading in the stock market, having a clear …
Read Article
Turn $10 into $1000 in Forex - A Step-by-Step Guide Forex trading is a popular way to invest and potentially make significant profits. With just a …
Read Article


