


Understanding the 5 Day Moving Average: How it Works and Why it Matters
Understanding the Importance of the 5 Day Moving Average When it comes to analyzing stock market trends and making informed investment decisions, …
Read Article
ImageJ is a powerful image processing software that provides various tools and functions for scientific and research purposes. One of its features is the ability to stack two or more images together, allowing you to overlay and compare them side by side. This can be extremely useful when analyzing and interpreting data from different sources or experiments.
In this step-by-step guide, we will walk you through the process of stacking two images in ImageJ. Whether you are a beginner or an experienced user, you will find this tutorial helpful in understanding and utilizing this particular function of ImageJ.
Step 1: Open ImageJ and load the two images you want to stack. You can do this by going to File > Open and selecting the files from your computer. Make sure that both images have the same dimensions and are compatible with ImageJ.
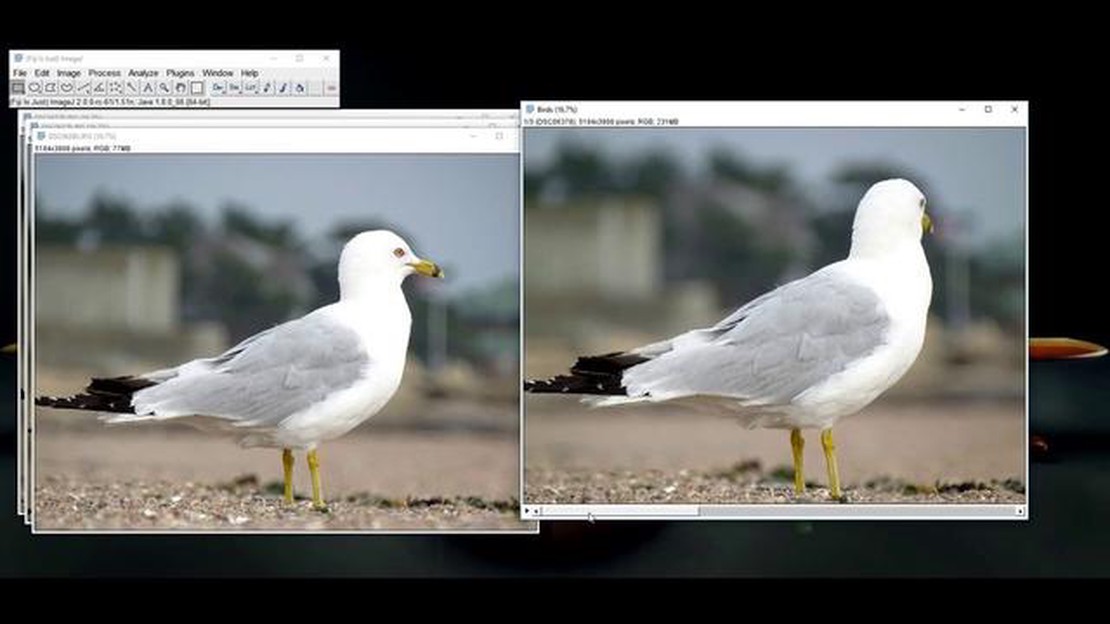
Step 2: Once the images are loaded, go to the Image menu and select Stacks > Images to Stack. A new window will appear, displaying the loaded images. You can arrange the order of the images by dragging and dropping them.
Step 3: After arranging the images, click OK. The two images will now be stacked in a single window. You can use the Scrollbar to navigate through the images and the zoom function to adjust the level of magnification.
By following these simple steps, you can easily stack two or more images in ImageJ. This feature is particularly beneficial for comparative analysis and visualizations, allowing you to gain valuable insights from your data.
ImageJ is a powerful image processing software that can be used for a variety of tasks, including stacking images. Stacking images involves combining multiple images into a single image, where each pixel value represents the corresponding pixel values from the input images.
There are several reasons why you may want to stack images in ImageJ:
| **1. Increased Depth of Field:**By stacking images taken at different focal planes, you can create an image with a larger depth of field, resulting in a sharper and more detailed final image. | **2. Noise Reduction:**By stacking multiple images of the same scene, you can average out the noise, resulting in a cleaner and less noisy image. |
| **3. Increased Dynamic Range:**When dealing with high contrast scenes, stacking images taken with different exposures can help capture more details in the shadows and highlights, resulting in a final image with a wider dynamic range. | **4. Time-lapse and Long Exposure:**Stacking images taken over a period of time or with long exposure can result in unique visual effects, such as light trails or star trails. |
Read Also: John Wick Shotgun: What Shotgun Did He Use in the Movies?
ImageJ provides a simple and intuitive interface for stacking images, making it accessible for both beginners and advanced users. Whether you are a scientist, a photographer, or a hobbyist, knowing how to stack images in ImageJ can greatly enhance your image processing capabilities.
ImageJ is a powerful image processing software that allows you to perform various tasks, including stacking multiple images. Stacking images is a useful technique to combine multiple images into one, which can be beneficial in tasks such as creating composite images, comparing images, or analyzing image data.
Read Also: What is a Weighted Average? Simple Example and Explanation
Here is a step-by-step guide on how to stack two images in ImageJ:
By following these steps, you can easily stack two images in ImageJ and create a merged image for further analysis or visualization. Experiment with different stacking methods and parameters to achieve the desired result and explore the various possibilities offered by ImageJ.
ImageJ is a Java-based image processing program that allows users to analyze and manipulate images.
Stacking two images in ImageJ can be useful for various purposes such as comparing two images, creating an image with a greater depth of field, or enhancing image contrast.
Yes, ImageJ is completely free and open-source software that can be downloaded and used by anyone.
Yes, ImageJ allows you to stack images with different dimensions. However, when stacking images with different sizes, the smaller image will be scaled to match the larger image.

One limitation of stacking images in ImageJ is that the resulting stack can only be saved in the TIFF file format. Additionally, ImageJ may not be suitable for complex image stacking tasks that require advanced algorithms or extensive processing.
ImageJ is a popular image processing software that allows users to analyze, edit, and manipulate digital images.

Understanding the Importance of the 5 Day Moving Average When it comes to analyzing stock market trends and making informed investment decisions, …
Read Article
How to Write Options in Ibkr Options trading can be a lucrative investment strategy, but it’s important to understand the mechanics of writing options …
Read Article
Cost of a Forex License in Dubai Dubai, the financial hub of the Middle East, has become a popular destination for those looking to set up their own …
Read Article
What is RDS in trading? When it comes to trading, there are various terms and concepts that traders need to be familiar with in order to make informed …
Read Article
Choosing the Best Moving Average Indicator When it comes to trading in the financial markets, finding the best indicator for your strategy is crucial. …
Read Article
Ways to Find Stock Options Stock options can be a powerful investment tool, allowing you to potentially profit from the movement of a company’s stock …
Read Article


