


How to calculate a moving average for 5 years
Calculating Moving Average for 5 Years Calculating a moving average is an essential statistical technique used in finance, economics, and other fields …
Read Article
If you work with XML files on a regular basis, having a dedicated XML tool can greatly streamline your workflow. Notepad++ is a popular text editor that offers a wide range of plugins, including one specifically designed for XML editing. In this step-by-step guide, we will walk you through the process of installing the XML tool in Notepad++.
Step 1: Download Notepad++
The first step is to download and install Notepad++ if you don’t already have it. Notepad++ is available for free on the official website, and it supports Windows operating systems.
Step 2: Install the Plugin Manager
Next, you will need to install the Plugin Manager for Notepad++. This tool allows you to easily install, update, and manage plugins. To install the Plugin Manager, go to the Notepad++ website, download the Plugin Manager ZIP file, and extract it.
Step 3: Install the XML Tool
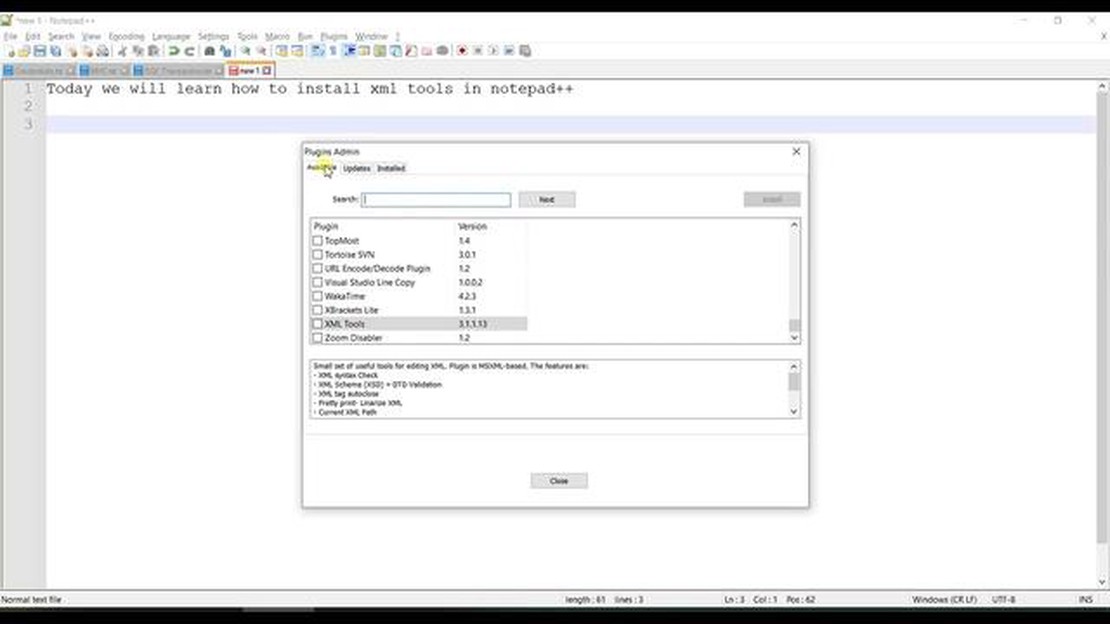
Once you have the Plugin Manager installed, open Notepad++ and go to the “Plugins” menu. Select “Plugin Manager” and then “Show Plugin Manager.” In the Plugin Manager window, select the “XML Tools” plugin and click the “Install” button. Follow the prompts to complete the installation.
Step 4: Verify the Installation
To verify that the XML tool was installed correctly, go to the “Plugins” menu again and select “XML Tools.” You should see a list of options related to XML editing and formatting. If you see these options, the XML tool has been successfully installed.
With the XML tool installed in Notepad++, you can now take advantage of its features to edit, validate, and format your XML files more efficiently. Enjoy your enhanced XML editing experience!
Notepad++ is free software that allows you to edit text and write code in various programming languages. To install the XML tool, you first need to download and install Notepad++ on your computer.
Follow these steps to download Notepad++:

Now that you have downloaded and installed Notepad++, you are ready to install the XML tool.
In order to install the XML tool in Notepad++, you will need to enable the Plugin Manager. The Plugin Manager is a built-in feature of Notepad++ that allows you to easily install and manage plugins.
Follow the steps below to enable the Plugin Manager:
| Step 1: | Open Notepad++. |
| Step 2: | Go to the “Plugins” menu. |
| Step 3: | Select “Plugin Manager” and click on “Show Plugin Manager”. |
| Step 4: | The Plugin Manager window will appear. Click on the “Settings” tab. |
| Step 5: | Check the box next to “Show unstable plugins” if you want to see and install unstable plugins. |
| Step 6: | Click on the “Plugins” tab. |
| Step 7: | Click on the “Available” tab to see the list of available plugins. |
| Step 8: | Select “Plugin Manager” from the list and click on the “Install” button. |
| Step 9: | Wait for the installation to complete. |
| Step 10: | Once the installation is finished, click on the “Close” button. |
Read Also: Benefits of Offering Stock Options: Why Do Companies Grant Stock Options?
After enabling the Plugin Manager, you will be able to install the XML tool and other plugins in Notepad++ with ease.
To install the XML Tool in Notepad++, follow these step-by-step instructions:
Step 1: Open Notepad++ on your computer.
Step 2: Go to the “Plugins” menu at the top of the window, and select “Plugin Manager” from the dropdown menu.
Read Also: Understanding the System of Exchange: A Comprehensive Guide for Beginners
Step 3: In the Plugin Manager window, click on the “Show Plugin Manager” button.
Step 4: Scroll down the list of available plugins and find “XML Tools”. Click the checkbox next to it to select it for installation.
Step 5: Click on the “Install” button at the bottom of the Plugin Manager window.
Step 6: Wait for the installation process to complete. You will see a progress bar indicating the status of the installation.

Step 7: Once the installation is complete, click on the “Close” button to close the Plugin Manager window.
Step 8: Restart Notepad++ to apply the changes and activate the XML Tool.
Note: If you don’t see the Plugin Manager option in the Plugins menu, you may need to install it first. You can download the Plugin Manager from the Notepad++ website.
Congratulations! You have successfully installed the XML Tool in Notepad++. Now you can use this powerful tool to edit, validate, and transform XML files with ease.
The XML tool in Notepad++ is a plugin that allows you to view and edit XML files within the text editor.
You would want to install the XML tool in Notepad++ if you frequently work with XML files and want a more convenient way to view and edit them.
To install plugins in Notepad++, you can go to the “Plugins” menu, then select “Plugin Manager” and then “Show Plugin Manager”. From there, you can search for the XML tool and click on “Install” to install it.
No, there are no specific prerequisites for installing the XML tool in Notepad++.
Yes, you can customize the XML tool in Notepad++ by going to the “Plugins” menu, then selecting “XML Tools” and then “Options”. From there, you can customize various settings such as the display format and validation options.
The XML tool in Notepad++ is a plugin that allows users to manipulate and analyze XML files within the text editor software. It provides various features like tag auto-completion, validation, and formatting for XML files.

Calculating Moving Average for 5 Years Calculating a moving average is an essential statistical technique used in finance, economics, and other fields …
Read Article
Alternatives to eToro: Exploring Better Investment Platforms eToro is a popular online trading platform that allows users to trade various financial …
Read Article
Forex Symbol for Crude Oil Forex trading is a popular way to invest in various financial markets, including commodities like crude oil. However, when …
Read Article
Understanding the 80% Rule in Day Trading In the world of day trading, where quick decisions and fast-paced markets reign supreme, implementing …
Read Article
What is the best moving average indicator strategy? When it comes to technical analysis in the financial markets, one of the most widely used …
Read Article
What is U and D in binomial option pricing? Introduction In binomial option pricing, the stock price is modeled as a binomial tree. The two …
Read Article


